Skip to content

Integrate Okta SSO

Administrators only

Connect Okta with Tallyfy using SAML-based Single Sign-On (SSO) for automatic authentication and user provisioning. Takes about 30 minutes.

  • Okta administrator account
  • A Tallyfy administrator account on any paid plan
  • The Tallyfy SP values from the SSO wizard (shown when you pick Okta)
  1. Create an Okta SAML application
  2. Configure settings in both systems
  3. Test the connection in the Tallyfy wizard, then turn SSO on
  1. Sign in to the Okta Admin Console

  2. Switch to Classic UI from the dropdown in the top left header

    Okta developer console menu header

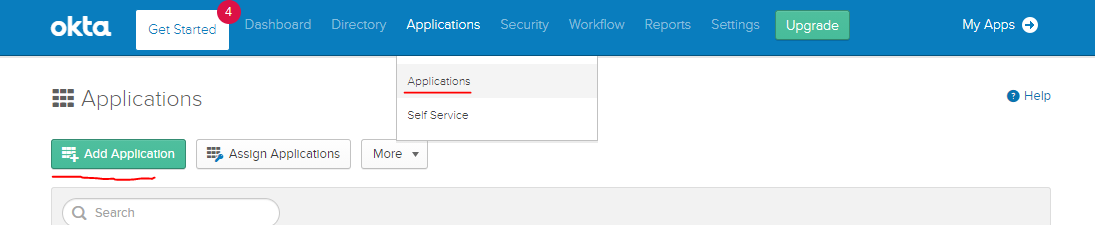
  3. Go to Applications > Applications

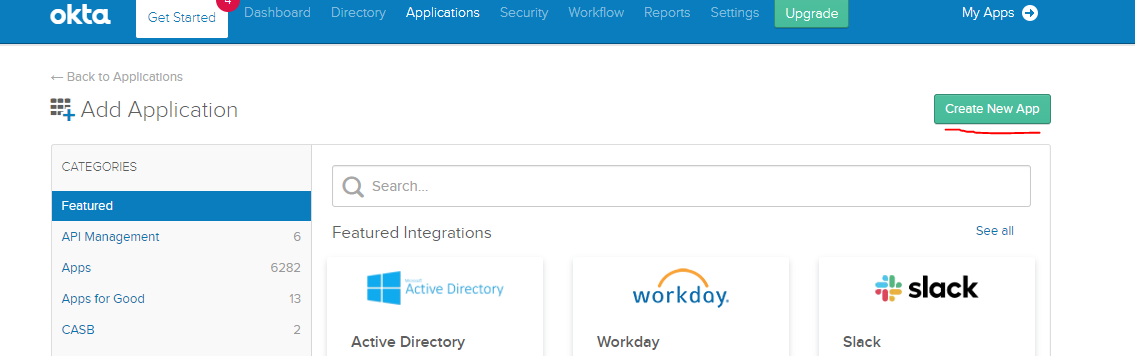
  4. Click Add Application

    Okta SSO setup workflow configuration screen

  5. Select Create New App

    Okta SSO setup workflow configuration screen

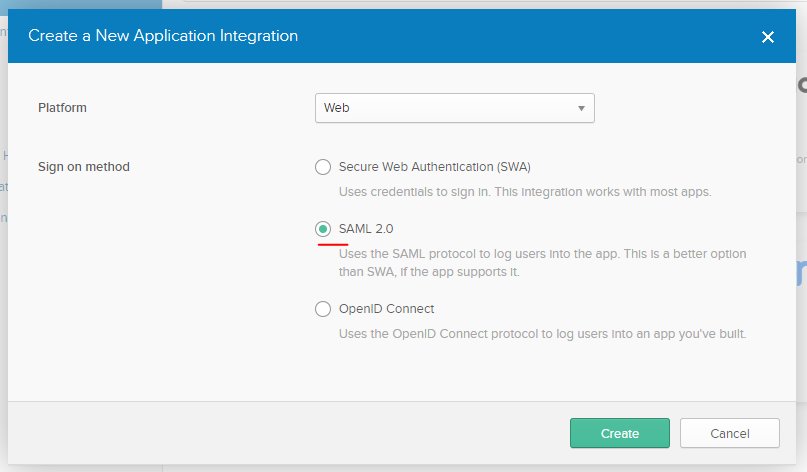
  6. In the dialog, select Web for Platform

  7. Select SAML 2.0 for Sign-on method

  8. Click Create

    Okta SSO setup workflow configuration screen

  1. Enter “Tallyfy” as the application name
  2. Optionally upload the Tallyfy logo
  3. Click Next

Grab Tallyfy’s SAML values first - these tell Okta where to send login data:

  1. In Tallyfy, go to Settings > Organization > Security > SSO
  2. Start a new connection and pick Okta as the provider
  3. Copy the SP ACS URL and SP Entity ID shown on the first step of the wizard

Now configure Okta with those values:

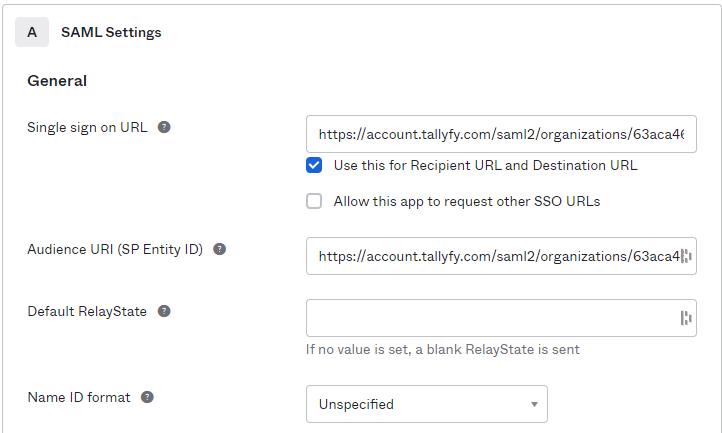
  1. Single Sign On URL: Enter the value from Tallyfy’s “SP ACS URL” field

  2. Keep Use this for Recipient URL and Destination URL checkbox selected

  3. Audience URI (SP Entity ID): Enter the value from Tallyfy’s “SP Entity ID” field

    Okta SSO setup workflow configuration screen

  4. Click Show Advanced Settings

  5. Change Authentication context class to X.509 Certificate

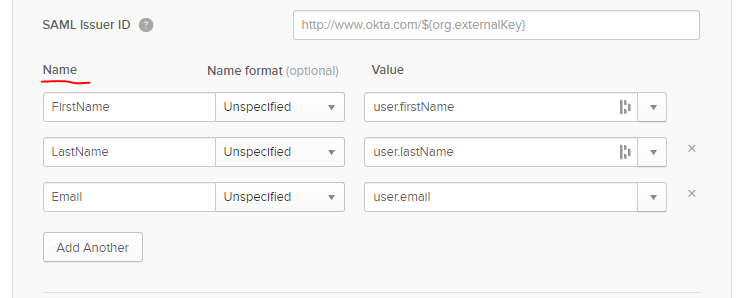
Tell Okta which user info to send to Tallyfy:

NameName FormatValue
emailUnspecifieduser.email
FirstNameUnspecifieduser.firstName
LastNameUnspecifieduser.lastName
Okta SSO setup workflow configuration screen
  1. After adding the attributes, click Next
  1. Select I’m an Okta customer adding an internal app
  2. Check This is an internal app that we have created
  3. Click Finish
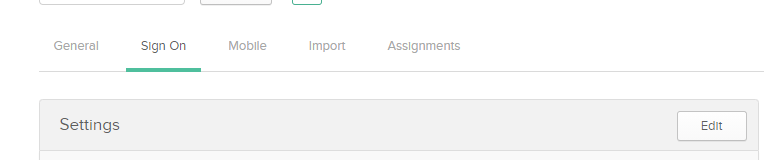
  1. Go to the Sign On tab in your Okta application

    Okta SSO setup workflow configuration screen

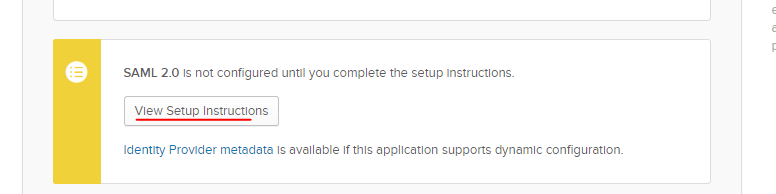
  2. Scroll down and click View Setup Instructions

    Okta SSO setup workflow configuration screen

  3. The page shows the identity provider’s SAML config details

Okta also gives you an Identity Provider metadata link on this page. Copy it if you’d rather use the metadata URL method.

Step 2: Paste Okta details into the Tallyfy wizard

Section titled “Step 2: Paste Okta details into the Tallyfy wizard”

Back in the Tallyfy SSO wizard (Settings > Organization > Security > SSO), move to the Enter IdP details step and pick a method:

  1. Metadata URL - paste the Okta Identity Provider metadata link. Tallyfy fetches and parses it. Easiest option.
  2. XML paste - paste the metadata XML if you downloaded it instead.
  3. Manual entry - enter the Identity Provider Single Sign-On URL, the Identity Provider Issuer, and the X.509 Certificate.
  1. Run the wizard’s Test connection step. It checks your metadata and certificate. Fix anything it flags.
  2. Once the test passes, click Enable to turn SSO on for your organization

Once SSO is active:

  1. Get your org’s SSO login URL from the SSO wizard (it’s shown next to the connection)
  2. Share this URL with users who have access to the Okta application

Here’s how it works for your users:

  • Already have a Tallyfy account? They’ll log in automatically
  • No account yet? If auto-join is on and their email is on a verified domain, Tallyfy creates an account on first login. Verify your domain under the Domains tab first. See Domain verification.

The full authentication process from setup to user access:

SSO authentication flow

Key points:

  • Steps 1-6 are the one-time self-serve setup you run yourself across Tallyfy and Okta
  • Steps 7-14 happen every time a user logs in
  • Tallyfy auto-creates accounts for new users from a verified domain (step 13) using the email and name attributes from Okta

SAML handles login. SCIM handles your user roster. With Okta’s SCIM 2.0 provisioning on, Okta pushes assignments and deactivations to Tallyfy automatically, so accounts appear and disappear in step with Okta and you stop paying for people who’ve left.

  1. In Tallyfy, go to Settings > Organization > Security > SCIM and turn SCIM on
  2. Copy the Base URL and the bearer token (the token shows once, so store it safely)
  3. In Okta, open your Tallyfy app and go to the Provisioning tab, then Configure API Integration
  4. Check Enable API integration, paste the Tallyfy Base URL into the SCIM connector base URL field, and paste the bearer token as the API token
  5. Click Test API Credentials, then save. Under To App, enable Create, Update, and Deactivate Users.

To map Okta groups to Tallyfy roles, push groups whose names match Tallyfy’s reserved group names (for example tallyfy-admins). Full details are in SCIM provisioning.

Can’t log in? Check these first:

  • Is the user assigned to the Okta application?
  • Are attribute mappings exactly right? Names and formats matter.
  • Are users hitting the SSO URL, not the regular Tallyfy login page?
  • Still stuck? Contact Tallyfy Support.